Many years ago (almost 8 years now :o), I had no idea what I was doing, but had a plan of make a little PCB box that enclosed a PS360 inside to give me PS3 and 360 compatibility that I could connect up to my Astro City at the time and I ended up doing something like this
The little jiffy box became a staple for the vertical cab setup I had as I would use it to play the Cave SHMUPs on the 360. This served me well for many years until I eventually upgraded to original hardware.
Recently, I’ve been mucking around with getting consoles into a cab and one of the challenges has always been the controls, each console needed 2 sets of pad hacks so I decided I’d do something similar to what I did with the PS360 PCB box and build jiffy boxes that had a MC Cthulhu inside one box and the transplant my Wii pad hack to a jiffy box to make it all nice and uniform.
I chose to use an MC Cthulhu because it has the most compatibility of any pcb’s out on the market. There is the Brook Retro Board, but I couldn’t find any in stock and I believe they now OOP. I also found a pair of PS360+ but I found them a little too expensive for the work I wanted to do.
Compatibility for the MC Cthulhu is as follows:
- PlayStation 3, PC via USB
- All these “retro consoles” via specialised RJ-45 cables
- PlayStation 1 & 2
- Original Xbox
- Gamecube (including Wii Virtual Console titles)
- Sega Saturn
- NES/Famicom
- SNES/Super Famicom
- TurboGrafx-16/PC-Engine
- Dreamcast (no VMU support, only works with arcade-style games)
- 3DO
Since the MC Cthulhu is over 15 years old, finding a pair was the first thing I needed to do, so I reached out to a number of people around the world that I’ve met through this hobby but unfortunately nobody had any.
I then reached out locally to a few people and I was lucky enough that one person had a pair they were happy to let go. Very well priced, it made no sense to pass it up.
The MC Cthulhu’s are in my possession!
The wiring on this was essentially how I was going to wire mine up, but I wanted mine in the same size Jiffy box as I worked on previously.
Since I didn’t have the old schematics from the PS360, I traced out all the wiring with a multimeter and came up with the following:
The first night didn’t go down too well as I got too happy with the drill cutting the Jiffy box which resulted in this!
Failure on the right hand side
The failure worked out as my measurements were off and allowed me to fine tune it a little more to match my original setup. As you can see, I need to move the 16mm buttons to the right a little and move the 24mm USB jack quite a bit more to the left.
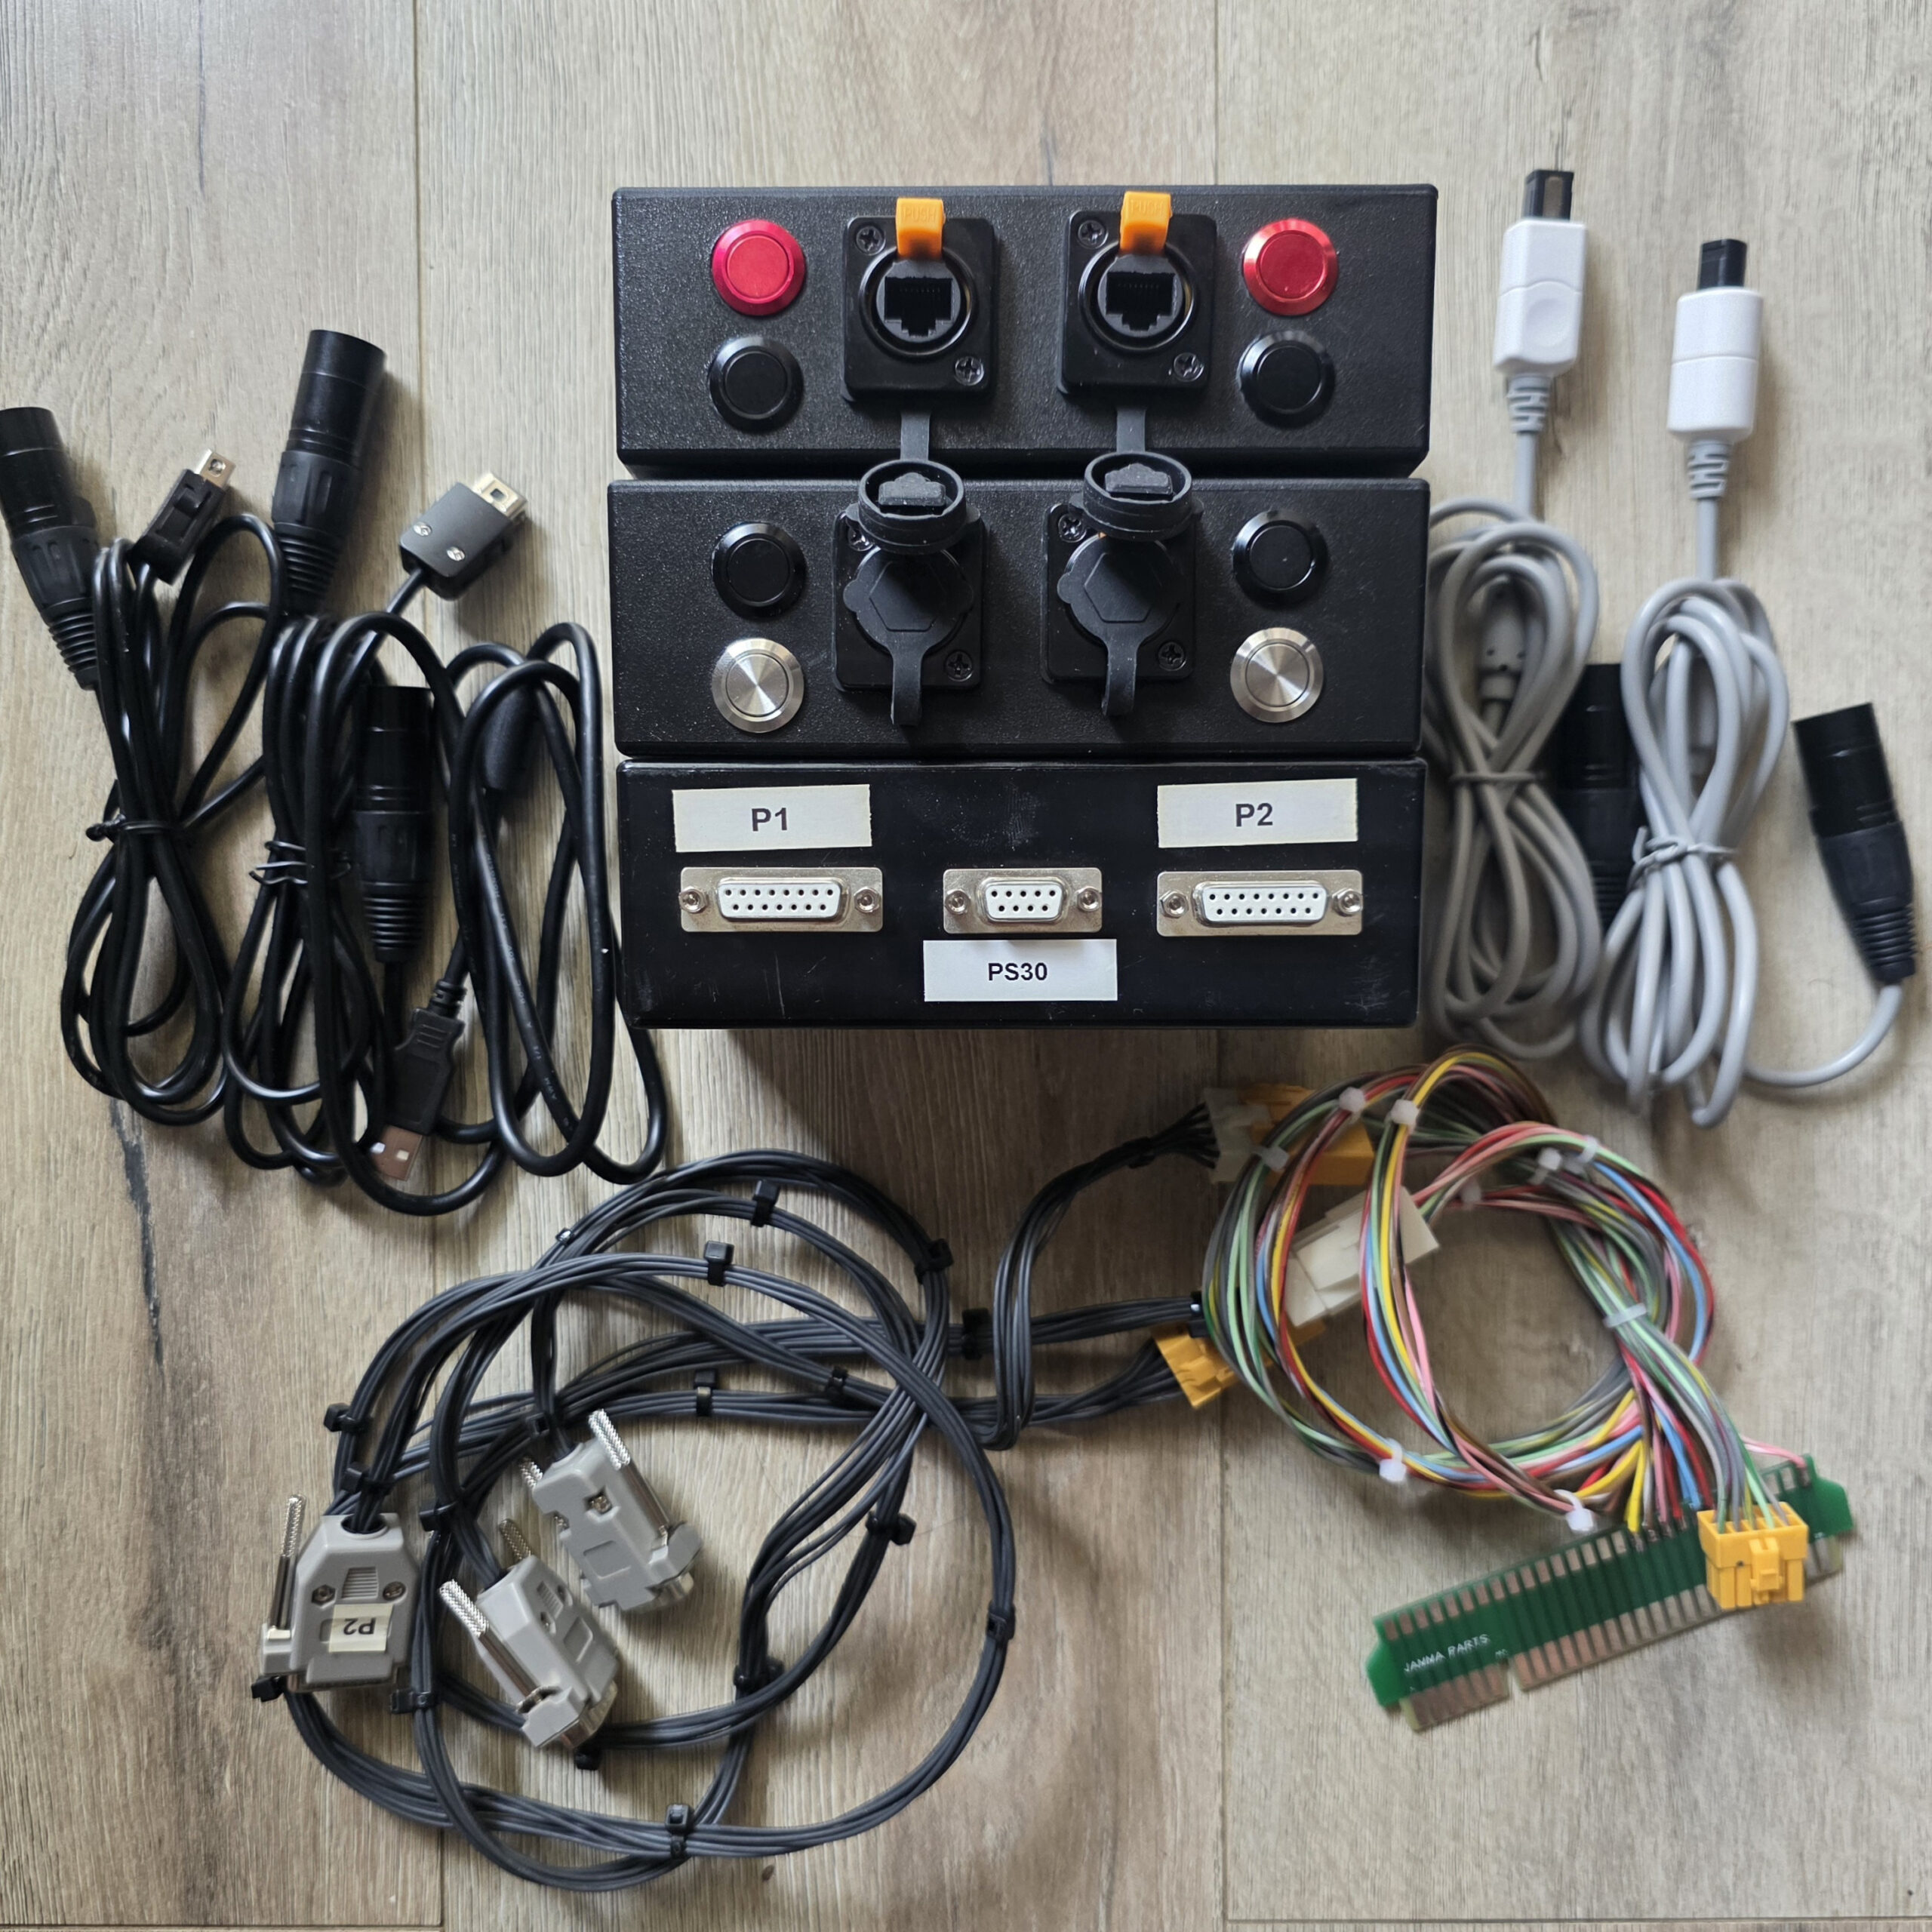
New measurements were taken and this was the best I could come up with – it’s not the prettiest thing in the world, but when the stuff is installed, it’s hidden enough 😀
Button and Jack side
DB15 and DB9 side
Let the wiring commence!
Initial test fit – she’s good!
What a mess! The recycled arcade harness wires I used for this project didn’t have the most flexible insulation and I probably shouldn’t have cut both sets the same length. One should’ve been longer than the other. I initially had an issue where I wired the second row of the DB15 and DB9 back to front, but thank goodness for a multimeter as I was able to identify that and fix it when I was checking the wiring. What a pain it would’ve been only to find that out when testing on a console!
Had to wait a couple of weeks to get my RJ45 port and connector – I decided to purchase this lot as it was the most economical for me. It’s way cheaper than the Neutrik equivalent.
When they arrived, they were a perfect fit!
Next on the list was to make the connectors per console. I had 5 barrels, so it was going to be 2 for the Wii, 2 for the DC and 1 USB – I will make more eventually, but for now, it’s just these 5
DC to RJ45
USB to RJ45
The bits and pieces for the barrel and RJ45 jack
Quick test fit, it locks in perfectly and has OEM look to it 🙂
Testing on a Dreamcast.
Unfortunately, it didn’t work first go and I couldn’t figure out why P2 didn’t work initially. I swapped the cables around, so I knew it wasn’t the DC cable I made, I probed all the P2 points and it all checked out fine, I probed the RJ45 connector and that connected fine. I even made new cables and rewired the RJ45 connector and jack, but to my frustration, it still didn’t work.
It was only when I tested the Wii version that I realised what the hell was wrong, I hadn’t plugged the P2 side to the actual cabinet!! Yeah I’m a dumbass!
I probably didn’t need to remake any cables or rewire any connectors, I just needed to plug in the P2 harness from the PCB Box to the P2 connector on the JAMMA edge! The Yellow 12 way connector!
Cables have been made with the barrels I’ve got, I’ll order some more in the future and make at least Gamecube, PS1/2 and Sega Saturn ones.
Really happy with how these have turned out and will make playing a console on a JAMMA cab so much easier with these three jiffy boxes. Add a Brook converter into the mix and I’ve really got compatibility to anything if I wanted to – but for now, it’s purely about 240p and 480p setups!